Chevy Truck Tail Light Wiring Color Code: The Ultimate Guide to Diagnostics and Repair
Driving with a malfunctioning taillight isn’t just a safety hazard; it’s a guaranteed way to get pulled over. Whether you are restoring a classic C1500 or fixing a modern Silverado, understanding the Chevy truck tail light wiring color code is the only way to fix the problem correctly the first time.
Many truck owners feel intimidated by electrical work. The bundle of multicolored wires running along the frame rail can look like spaghetti. However, Chevrolet has used a relatively consistent color logic for decades. Once you know the code, diagnosing a bad ground or installing a trailer harness becomes a simple 30-minute job.
Understanding Chevy Tail Light Systems and Layouts
Before you start cutting wires or crimping connectors, you need to know what kind of system you are working with. Not all Chevy trucks handle lighting the same way. The strategy for fixing a 1990s pickup is very different from working on a 2015 model.
The Evolution of Chevy Wiring
The biggest change in Chevy wiring happened in the early 2000s.
- Vintage/Analog Systems (Pre-2000s): Older trucks use simple, direct circuits. When you press the brake pedal, a switch closes, and 12-volt power rushes directly to the bulb filament. These systems are robust and easy to test with a basic light.
- Modern/Digital Systems (Post-2000s): Modern trucks, such as the 2009 and 2012 Silverado, utilize a Body Control Module (BCM). In these vehicles, the brake switch sends a low-voltage signal to a computer (the BCM), which then decides to turn on the lights. This allows for features like “lane change flash,” but it makes troubleshooting trickier because the computer monitors electrical resistance.
Factory vs. Aftermarket Assemblies
If you bought your truck used, check the tail light housings. Factory assemblies follow the standard Chevy color codes we will discuss below. However, aftermarket LED housings often use their own random wire colors.
Always trace the wires back to the factory harness plug. The connector where the light plugs into the truck’s main harness is where the “truth” lies. The colors on the truck side of that plug will almost always match the standard GM codes, regardless of what the aftermarket light manufacturer used.
Locating the Wiring Harness
On almost every Chevy pickup, the main rear lighting harness runs along the driver-side frame rail. It travels from the engine bay, down the frame, and splits off at the rear bumper to feed both tail lights and the trailer plug.
You will likely spend some time under the truck to inspect this harness. It helps to be familiar with the layout of under-chassis components. For instance, just as a mechanic needs to know where the catalytic converter is located on a Chevy Cavalier to perform exhaust diagnostics, you must identify the specific grounding points on your truck’s frame rail to ensure a solid electrical circuit. These ground points are often located near the rear spare tire carrier and are prone to rust, which is the number one killer of tail light function.
Master Chevy Truck Tail Light Wiring Color Code Chart
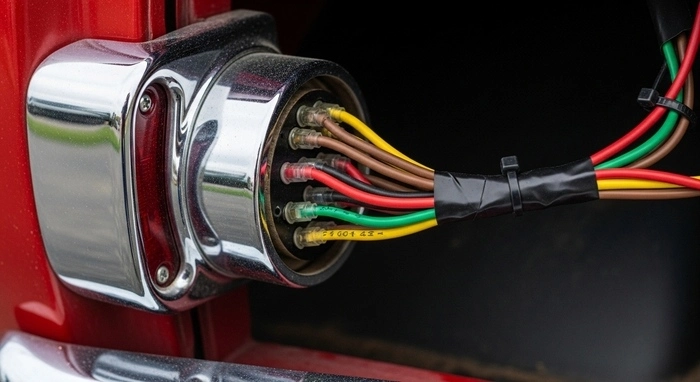
This is the core information you need. While there are occasional variations depending on the trim level or year, these five colors are the gold standard for General Motors trucks.
Standard Wire Color Meanings
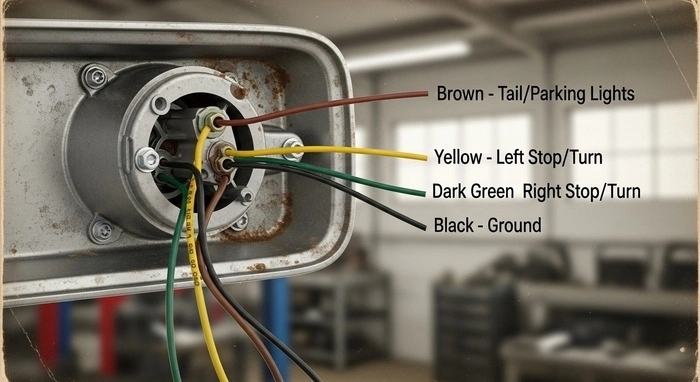
- Brown: Running Lights / Parking Lamps. This wire carries constant power whenever your headlights or parking lights are on. It feeds the dim filament in the bulb and the license plate lights.
- Yellow: Left Stop & Turn Signal. This is the “driver side” control wire. It handles two jobs: it pulses on and off for the turn signal and stays solid bright for the brake light.
- Dark Green: Right Stop & Turn Signal. This is the “passenger side” counterpart to the yellow wire. It also handles both braking and turning for the right side.
- Light Green: Backup (Reverse) Lamps. This wire only gets power when you shift the transmission into Reverse. Note: On some older models, this might be light blue.
- Black: Chassis Ground. This is the most critical wire. It connects the light assembly to the metal frame of the truck. If this connection is loose or rusty, your lights will flicker or dim when you hit the brakes.
Variations by Model Year
While the Brown-Yellow-Green trio is famous, always double-check. Some mid-2000s SUVs and trucks might use a Light Blue or Tan wire for the auxiliary or reverse circuit. Additionally, many aftermarket trailer harnesses use White for the ground wire, which can be confusing since Chevy uses Black for ground. If you see a white wire spliced into a black wire, that is likely a previous owner’s trailer light repair.
How to Read and Use a Chevy Wiring Diagram
Staring at a wiring diagram can feel like trying to read a foreign language if you don’t know the symbols. However, these schematics are just road maps for electricity. They show you exactly where the power starts (the battery), where it goes (the fuse box), and how it gets to the destination (the tail light).
Deciphering Schematic Symbols
You don’t need to be an electrical engineer to understand the basics. The most important symbol you will see is the Ground symbol, which usually looks like a series of shrinking horizontal lines or a pitchfork. This tells you where the wire bolts to the metal frame.
Another key symbol is the Connector block. On a Chevy diagram, this often looks like a rectangle with numbers inside. These numbers correspond to the “pinout” on the actual plastic plug. If the diagram says the yellow wire goes to “Pin A,” look at the face of your connector; you will likely see tiny letters molded into the plastic next to each hole.
Tracing the Circuit
When you have a dead light, start at the bulb on the diagram and work backward. Follow the line from the bulb to the socket, then to the connector, and finally back to the fuse. This “reverse tracing” method helps you identify every possible failure point. If the fuse is good but the light is dead, the break in the circuit must be somewhere between the fuse block and the tail light socket.
Tools and Safety for Electrical Work
You cannot fix what you cannot measure. Guessing which wire is which often leads to blown fuses or melted plastic. To work safely, you need a few basic tools.
Essential Tools
A Digital Multimeter (DVM) is your best friend here. While a simple 12V test light glows to show power, a multimeter gives you exact numbers. It tells you if you have a full 12 volts or a weak 9 volts caused by corrosion.
You will also need a quality pair of wire strippers and a crimping tool. Avoid the cheap “all-in-one” tools found in bargain bins; they often crush the connector instead of securing it. For sealing your repairs, a heat gun is essential for shrinking insulation tubing.
Safety First
Before you cut or splice any wire, always disconnect the Negative (Black) battery cable. This prevents you from accidentally shorting a live wire against the frame, which could blow a major fuse or damage the computer.
Speaking of computers, modern trucks are sensitive. While a standard scanner is perfect for diagnosing powertrain issues like a 7ea engine code, diagnosing lighting faults often requires manual testing. The Body Control Module (BCM) may not always throw a clear “check engine” code for a shorted turn signal, so you have to rely on your meter, not just a scan tool.
Step-by-Step Diagnostic and Troubleshooting Guide
If your tail lights are acting up—flickering, dimming, or just dead—follow this logical process to find the culprit without wasting time.
Verifying Wire Functions (The “Live” Test)
The quickest way to identify wires is a live test. Secure the truck with the parking brake and have a helper sit in the driver’s seat. Ask them to cycle through the functions: running lights, left turn, right turn, brake, and reverse.
While they do this, use your test light to probe the connector pins at the rear bumper. This confirms if the signal is even reaching the back of the truck. If you have a signal at the bumper but not at the bulb, you know the harness is good and the problem is in the tail light assembly itself.
The “Bad Ground” Theory
If you encounter weird symptoms—like the reverse lights glowing faintly when you press the brake, or one turn signal blinking slower than the other—you almost certainly have a bad ground.
Electricity always seeks the path of least resistance. If the main ground wire (Black) is rusted or broken, the current will try to find another way back to the battery. It will often flow backward through another bulb, causing multiple lights to glow dimly. Locate the ground screw on the chassis, remove it, sand the metal until it shines, and reattach it tight.
Testing for Power (Voltage)
Set your multimeter to DC Volts (20V range). Place the black probe on a clean metal bolt (chassis ground) and use the red probe to touch the metal contact inside the bulb socket.
- Running Lights: Should read steady ~12V.
- Brake/Turn: Should jump between 0V and 12V when flashing.
If you see voltage here but the bulb doesn’t light up, the bulb is bad. If you see 0 volts, the problem is upstream (a fuse or broken wire).
Common Chevy Tail Light Problems and Fixes
Knowing the common failure points on Chevy trucks can save you hours of searching.
Corroded Sockets and Connectors
Moisture is the enemy. On trucks like the Silverado, the rear connectors are exposed to road spray, salt, and mud. Over time, this creates a green, crusty substance on the copper pins called oxidation. This “green death” blocks electricity.
Pull the connectors apart and inspect the pins. If you see green or white powder, clean it out with electrical contact cleaner and a small wire brush. When you reassemble, pack the connector with dielectric grease to waterproof it.
Blown Fuses
If both tail lights go out simultaneously, check the fuse box first. On older models, this is often a simple 10A or 15A fuse labeled “PARK” or “STOP.” On newer models, the left and right sides might have separate fuses. Consult your owner’s manual for the exact location, as Chevy has moved the fuse block from the side of the dash to under the hood in different generations.
Upgrading to LED Tail Lights
Many Chevy truck owners are ditching their old, dim halogen bulbs for modern LEDs. The benefits are obvious: LEDs are brighter, light up faster (giving drivers behind you more reaction time), and last significantly longer. However, simply swapping the bulbs often leads to a common annoyance known as “hyper-flash.”
The “Hyper-Flash” Phenomenon
Your truck’s flasher relay relies on the electrical resistance of a standard filament bulb to determine the timing of the blink. LED bulbs draw so little power that the system assumes the bulb is burnt out. To warn you, the dashboard indicator blinks rapidly—this is hyper-flash.
Installing Load Resistors
To fix this, you need to trick the system. You can install a load resistor or an electronic flasher relay. A load resistor is wired in parallel (one end to the turn signal wire, the other to the ground wire) to simulate the load of a traditional bulb.
If you are wiring a full aftermarket LED assembly, you might encounter a 3-wire vs. 4-wire mismatch.
- 3-Wire: Brake and turn share one wire (standard Chevy setup).
- 4-Wire: Brake and turn are separate (common on some trailers or foreign vehicles). To make these compatible, you will need a converter box that combines the brake and turn signals into a single wire for your Chevy harness.
Trailer Wiring and Towing Integration
Since most Chevy trucks are workhorses, understanding the trailer plug is just as important as the taillights themselves. The wiring at the bumper plug usually mirrors the taillight colors, but the connector types vary.
Matching Truck Outputs to Trailer Inputs
- 4-Way Flat: This is the most common plug for boat and utility trailers.
- Green: Right Turn/Brake.
- Yellow: Left Turn/Brake.
- Brown: Running Lights.
- White: Ground.
- 7-Way Round (RV Blade): Used for larger campers, this plug adds three more circuits:
- Blue: Electric Trailer Brakes (requires a brake controller in the cab).
- Red/Black: 12V Auxiliary Power (charges the trailer battery).
- Purple/Center: Reverse Lights (often used for solenoid brakes on boat trailers).
Using T-Connectors
Avoid the temptation to use “scotch locks” or splice into your factory harness with electrical tape. This introduces moisture into the copper strands, leading to green corrosion that travels up the wire. Instead, spend a few extra dollars on a T-Connector harness. These plug directly into the factory tail light sockets—no cutting required—and provide a clean, weather-sealed 4-flat output.
Grounding the Trailer
Never rely on the hitch ball to ground your trailer. While metal touches metal, grease and rust prevent a solid connection. Always ensure the White wire on the trailer side is firmly bolted to the trailer tongue with a star washer to bite into the clean metal.
Maintenance and Longevity Tips
A little prevention goes a long way. To keep your lights shining bright for years, add these simple steps to your routine.
- Dielectric Grease: Every time you change a bulb, squirt a little dielectric grease into the socket. This non-conductive grease seals out moisture and prevents the contacts from corroding.
- Cable Management: Loose wires are dangerous wires. Use zip ties to secure any slack in your harness, keeping it away from the hot exhaust pipe and moving suspension parts.
- Routine Inspection Checklist: Walk around your truck once a month. Check for cracked lenses that let water in, and verify that your license plate lights are working—it’s an easy ticket to avoid.
Conclusion
Electrical work doesn’t have to be a nightmare. By mastering the Chevy truck tail light wiring color code, you turn a confusing jumble of wires into a logical system. Remember the “Big Three”: Brown for running lights, Yellow for left turn, and Green for right turn.
Always double-check your Ground (Black) connection first, as it is the root of most problems. With the right diagram, a multimeter, and a bit of patience, you can keep your Silverado or Sierra safe, legal, and visible on the road.
FAQs
For most model years, the standard code is: Brown for running lights, Yellow for the left turn/brake, Dark Green for the right turn/brake, Light Green for reverse, and Black for ground.
You need to add resistance to the circuit. The easiest fix is to install a load resistor across the turn signal wire and the ground wire. Alternatively, you can replace your stock flasher relay with an electronic LED-compatible flasher.
While Light Green is standard, some specific trims or years (especially in the mid-2000s) used Light Blue or even Grey for the reverse circuit. Always test with a multimeter to be sure.
Not always. Aftermarket harness manufacturers often use different color standards (like White for ground instead of Black). Always verify the function of the wire (using a test light) rather than trusting the color of the insulation blindly.
If your running lights work (Brown wire) but the brake lights don’t (Yellow/Green wires), the issue is likely the brake light switch located near the brake pedal arm, or a blown fuse specifically for the stop lamps.